イタレリ RSO with PAK-40の製作開始
最近、各模型メーカーからRSOトラクターや、そのPak40搭載型が相次いでリリースされていて、ちょっとしたRSOブームが来ていますね。
直近ではタミヤからも素晴らしいキットが販売されましたが、今後のバリエーション展開は他メーカーのオプションパーツ頼みになりそうな予感がしています。
そんなタミヤの傑作RSOキットを見ているうちに、無性にRSOが作りたくなってしまいました。
ただ、「タミヤ製ならいつでも作れる!」と思い直し、今回はあえてイタレリの「RSO Pak40搭載型」をチョイス。手元のマテリアルをフル活用して贅沢に仕上げていくことにしました。
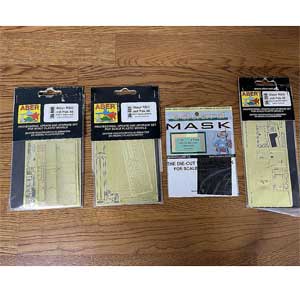
1. お目当てはこれ!エッチング3種セット
まずは足回りを引き締めるために、エッチングの3種セットを購入。
実はこれ、キットのディテールアップはもちろんですが、本当の目当ては別になります。
左側面に描かれている「車両諸元表示」を塗装で表現できるテンプレート(ステンシル)が欲しかったのです。
これさえあれば、いずれ作るであろうタミヤ製RSOのマーキングもバッチリ塗装で再現できるという算段です。
2. 秘蔵のアルミ挽き物砲身を召喚!
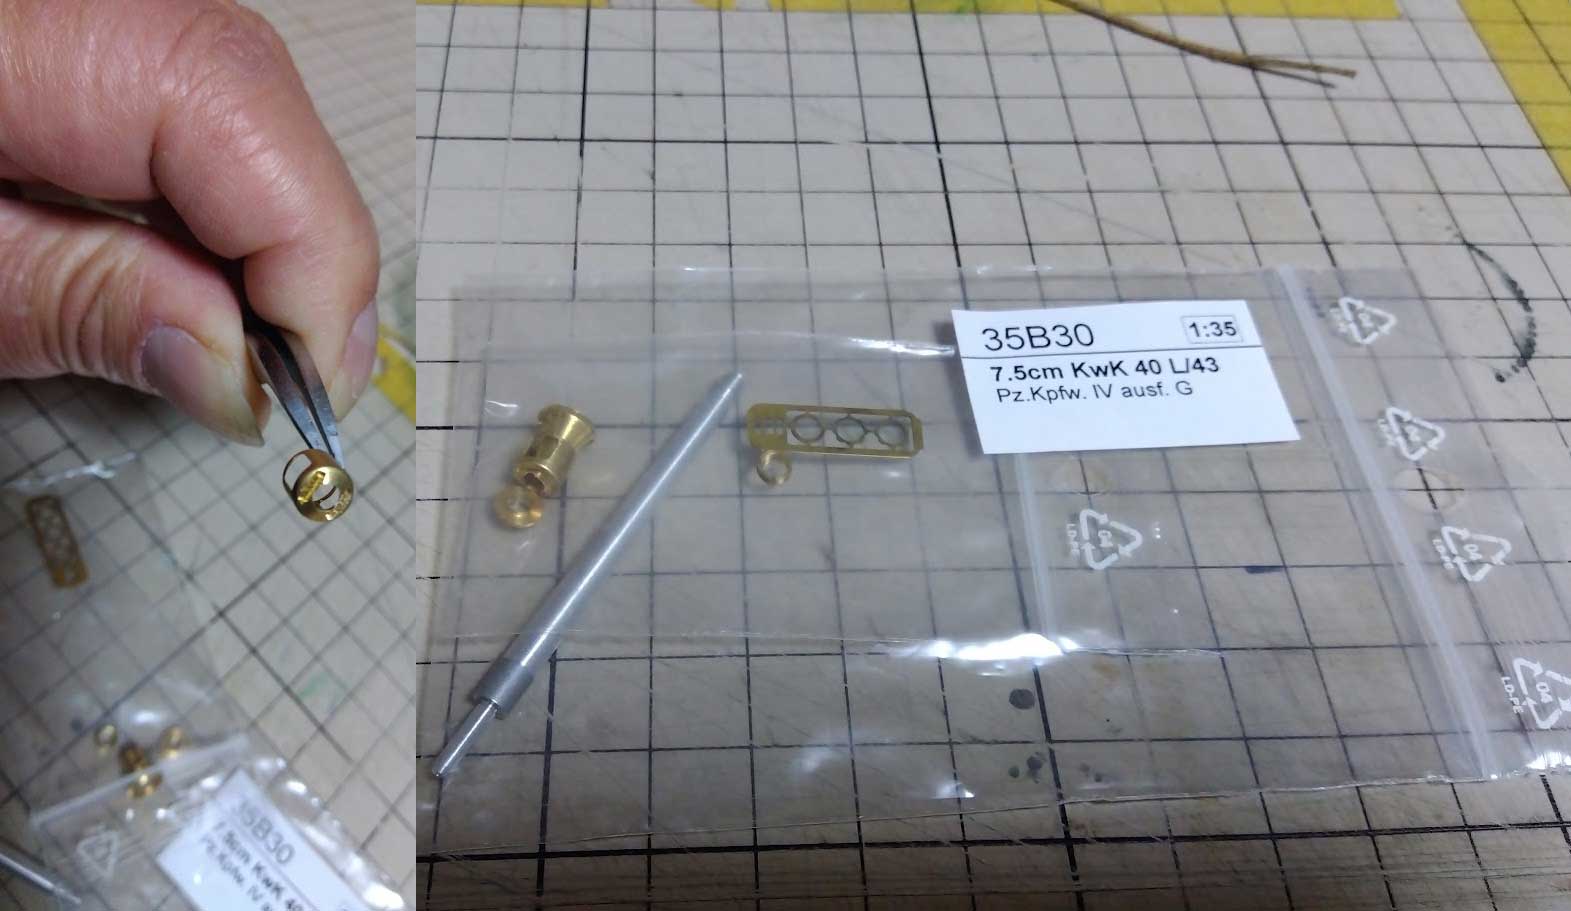
続いて、主砲のPak40。
以前「パンツァーレーア(現レギュラス)」さんで購入してストックしていた、アルミ挽き物の金属砲身を引っ張り出してきました。
アルミ製のシャープな砲身に、真鍮製のマズルブレーキが組み合わさるという、素晴らしい精度のパーツです。
これを使って一気に精密感を高めようと、ワクワクしながら手持ちのパーツを確認していたのですが……ここで激震が走ります。
数パーツで構成されている真鍮マズルブレーキの先端をよく見ると、何やら謎の凹みがあるのです。
3. まさかの罠…マズルブレーキに謎の凹み?
最初は「他のパーツをはめ込むためのガイド(凹)なのかな?」と思い、製品見本とじっくり見比べてみたのですが、そんなガイドはどこにも存在しません。
さらにルーペで拡大してよく見てみると、そこには生々しい切削痕が残っており、なんと向こう側がうっすら透けて見えているではありませんか……。
「……あ、これ、明らかな切削ミス(加工不良品)だ……」
価格が安かったので、検品の手が回らなかったのかもしれません。クオリティが素晴らしいだけに、この一箇所のミスは本当に惜しい!
キットの製作自体は進めたいので、この砲身パーツについては、今度ショップでお買い物をするついでに一度連絡して相談してみようと思います。
模型製作にトラブルは付き物(?)ですが、気を取り直してイタレリRSO、じっくり形にしていきたいと思います!
ちなみにこの主砲、トランペッター製「KV-1B 756(r)」用に購入していたものです。
流用できるかと思いきや、結局「PAK40搭載RSO」には使えないというオチがついてしまいました・・
Building Italeri’s RSO with Pak 40: A Tale of Premium Upgrades and a Hidden Flaw
It feels like the Raupenschlepper Ost (RSO) is having a major moment right now, with multiple manufacturers releasing the tractor and its Pak 40-mounted variants back-to-back. Even Tamiya recently dropped their own fantastic RSO kit, though I suspect we'll have to rely on aftermarket options for further variant conversions.
Looking at that gorgeous new Tamiya kit gave me a massive urge to build an RSO of my own.
However, knowing that the Tamiya kit will always be readily available down the road, I decided to pull Italeri’s RSO with Pak 40 out of the stash instead. I figured it would be a fun project to spice up with some nice aftermarket goodies.
1. The Real Reason I Bought the 3-Set PE Tour
First, I picked up a 3-set photo-etched (PE) detail-up set. While the extra details are nice, I actually had an ulterior motive for this purchase.
What I really wanted was the stencil template to airbrush the vehicle specifications (weight/loading data) onto the left side of the cab.
With this in hand, I’ll be able to paint those markings cleanly when I eventually build the Tamiya RSO, too!
2. Bringing Out the Secret Weapon: The Metal Barrel
Next up was upgrading the main gun—the Pak 40.
I went into my spare parts stash and pulled out a gorgeous turned aluminum barrel that I bought a while back from a shop called Panzer Lehr (now Regulus).
The machining on this thing is incredible: a super-sharp aluminum barrel paired with a multi-piece brass muzzle brake. It’s exactly the kind of precision part that elevates a build.
But as I was admiring it and checking the parts, I noticed something was off.
3. A Hidden Flaw in the Muzzle Brake...
Looking closely at the tip of the multi-piece brass muzzle brake, I spotted a mysterious indentation.
At first, I thought, "Maybe it's an alignment guide for another part?" But when I checked the product sample photos online, there was no such slot or guide to be found.
Taking a closer look, I could clearly see rough tool marks left behind, and the brass was machined so thin that light was literally bleeding through it.
Yep... it’s a definitive machining defect.
Since it was quite affordable, I guess a few bad apples slipped through quality control. It’s a real shame because the overall crispness of the parts is stunning.
I still want to push forward with the Italeri RSO, so I think I’ll reach out to the shop about a replacement the next time I order some supplies from them.
Dealing with QC issues is always a bit of a bummer, but that’s the modeling life! Time to pivot and keep this RSO build moving forward.
By the way, this main gun was originally purchased for the Trumpeter KV-1B 756(r).
I thought I could use it, but it turned out it couldn't be used for the RSO with Pak 40 after all. Talk about an ironic twist!
\ 最新情報をチェック /